
Resource Toolbox
CRISM Screen Saver
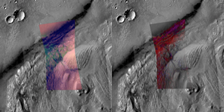
This downloadable screen saver lets you peruse highlights from the Compact Reconnaissance Imaging Spectrometer for Mars (CRISM) as it explored the Red Planet since 2006, from the vantage point of the Mars Reconnaissance Orbiter! The screen saver is a collection of some of CRISM’s most spectacular views of Mars. Each view is constructed from a Context Camera (CTX) component and a CRISM component. The CTX image serves as a black and white background; the CRISM image is laid on top of the CTX image and provides a false-color representation of the mineralogy on the surface. Each color in the CRISM overlay uses one or another combination of wavelengths that is sensitive to minerals present locally in the scene. The overlays look nothing like Mars looks to the human eye, which depending on the region is something between reddish gray and butterscotch. Instead, the overlays represent the wealth of color variations at infrared wavelengths invisible to the human eye.
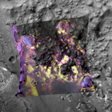
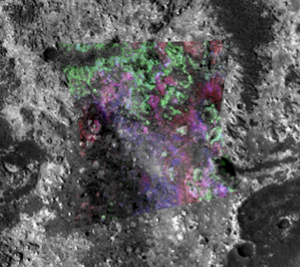 Each view of Mars in the CRISM Screen Saver is constructed from a CRISM (color) image overlying a CTX (black and white) background image, like the view shown here.
Download Zip (49MB)
Description of Included Images
The images in the screen saver are picked from coverage of 8 distinct regions of Mars:
1
1. Valles Marineris Canyon System
Valles Marineris is a large system of interconnected troughs or "chasmata" that stretches a quarter of the way around the planet just south of the equator. The views shown cover both layers in the chasma walls and sedimentary rock deposits located inside the chasmata, the so-called "interior layered deposits". The layers in the wall are mostly very ancient basaltic bedrock, and the lower parts of the walls expose igneous "intrusions" that cooled and solidified deep underground. Some layers in the walls have been altered to clay-like minerals, and in some places there is a top layer of opal. The clay-like minerals and opal record two distinct periods when Mars was wet in the subsurface or at the surface. Different layers of the interior layered deposits are dominated by dust, basaltic sand, or hydrated sulfates. Minerals in the layered deposits record a third period when Mars was wet, at least intermittently. The views of Valles Marineris highlight the interior layered deposits and the opal capping the wall materials.
2
2. Nili Fossae Region/Isidis Basin/Syrtis Major Planum
Nili Fossae is a group of tectonic troughs or "graben" that are concentric to the Isidis impact basin, that probably formed very soon after the basin itself. The rocks found around the graben here have very diverse compositions, and span ages from before Isidis to the time during and after formation of Syrtis Major Planum, a large martian shield volcano that has been inactive for billions of years. Volcanic rocks older than Isidis have a composition distinct from the rocks that form Syrtis Major. Rocks older than Isidis also contain a variety of minerals formed in water that was either in the subsurface or at the surface, including many varieties of clay-like minerals, carbonates, and sulfates. The views of the Nili Fossae region focus on areas that contain multiple units of different igneous and water-altered rocks.
3
3. Mawrth Vallis
Mawrth Vallis is an ancient channel that runs from the highlands of Arabia Terra northwest to the lowland region Acidalia Planitia, part of the northern plains. The rocks surrounding the channel have distinctive, layer-cake composition of clay minerals, with aluminum-rich clays overlying iron- and magnesium-rich clays. This region was one of the candidate landing site for the Curosity rover, and CRISM acquired many dozens of images here to characterize its geologic diversity. The views of the Mawrth Vallis region focus on the clay layers and the overlying, dark-colored cap rock that protected it from eroding away over billions of year.
4
4. Aram Chaos
Aram Chaos is a lowland region located at the far eastern end of Valles Marineris. Its extremely rough interior is typical of other Martian "chaos" regions, and is thought to have formed when subsurface material was withdrawn, causing near-surface rocks to collapse into a jumble of large blocks. Like other parts of Valles Marineris, Aram Chaos contain younger sedimentary rocks rich in sulfate minerals. The view of the floor of Aram Chaos focuses on one of the sulfate-rich regions.
5
5. Argyre Basin
Argyre, along with Isidis and Hellas, is one of the three youngest extremely large impact basins on Mars and is the best preserved of the three. The interior of the basin exposes compositionally diverse igneous "intrusions" that cooled and solidified deep underground. The region around the basin contains volcanic lava flows and debris ejected from the basin, both of which bury older rocks altered by water. The views of the Argyre basin focus on places where erosion has exposed the layering of these different materials.
6
6.Tharsis Region
The Tharsis plateau dominates the western hemisphere of Mars and is home to some of the largest volcanoes in the solar system. The plauteau itself is about the size of North America, and made up in large part of kilometers-thick volcanic lava flows. A chain of three volcanoes, each about the size of the state of Utah, is oriented northeast-southwest along the summit of the plateau. The views of the Tharsis region show one of three ancient lake deposits on the west side of the plateau, that may have been fed by acidic groundwater flowing through a subsurface aquifer.
7
7. Northern lowlands
Mars has two major geographical provinces, the northern lowlands and the southern highlands. In most places they are separated by what is the called the "dichotomy boundary". The northern lowlands are generally flat and covered by ancient lava and sediments. Two views of the lowlands focus on its peculiarities, knobs of eroded rock surrounded by lavas and an ice-filled crater near the north polar cap.
8
8. Dichotomy Boundary
The martian dichotomy boundary is a topographical transition between the higher southern hemisphere and the lower northern hemisphere. Gale Crater, the landing site for the Curiosity rover, straddles the dichotomy boundary in Mars' eastern hemisphere. Two views of Gale crater capture its compositional diversity.
COMING SOON: A booklet containing detailed descriptions of each image included in the CRISM Screen Saver!
Making the CRISM Screen Saver a Part of Your Computer
This screensaver does not come with an installer so unfortunately it has to be installed manually. (Kids: Be sure to ask your parents before you download anything!)
For Macs:
- Download the CRISM Screen Saver onto either your Desktop or iPhoto (if available).
- From the Apple menu, choose System Preferences.
- From the View menu, choose Desktop & Screen Saver.
- Click the Screen Saver tab to display the Screen Saver preferences. Screen Savers appear in the left pane. The right pane displays a preview of the selected screen saver.
- Select one of the Screen Savers in the left pane. *
*Changing the screen saver in Mountain Lion:
- In the Screen Saver preferences window, select one of the slideshow choices. A small preview appears in the right pane.
- Change the source for your slideshow by choosing either:
-“Choose Folder”: If you saved the CRISM Screen Saver to your desktop, choose the CRISM Screen Saver folder to use for the slideshow.
-“Photo Library”: If you have saved the CRISM Screen Saver in iPhoto, choose the CRISM Screen Saver iPhoto Event or select the CRISM Screen Saver images from your photo library.
*Changing the screen saver in OS X Lion or earlier
To add the CRISM Screen Saver as a slideshow screen saver, do one of the following:
- For iPhoto: In the Screen Saver preferences window, select iPhoto to turn your iPhoto images into a slideshow screen saver. Choose the CRISM Screen Saver event.
- For Desktop: In the Screen Saver preferences window, click the Add (+) button below the Screen Savers list and navigate to the CRISM Screen Saver folder. Click Choose to add the CRISM Screen Saver to your computer.
For more information on how to change the screen saver on your Mac, please visit: http://support.apple.com/kb/ht2485
For Windows:
- Windows 8:
- Open Screen Saver Settings by swiping in from the right edge of the screen, tapping Search (or if you're using a mouse, pointing to the upper-right corner of the screen, moving the mouse pointer down, and then clicking Search), entering Screen saver in the search box, tapping or clicking Settings, and then tapping or clicking Change screen saver.
- Under Screen saver, tap or click Photos.
- To specify the photos to use for the CRISM Screen Saver, tap or click Browse, choose the CRISM Screen Saver folder that contains the CRISM Screen Saver photos, and then tap or click OK.
For more information on how to change the screen saver using Windows 8, please visit: http://windows.microsoft.com/en-us/windows-8/using-screen-savers
- Windows 7:
- Open Screen Saver Settings by clicking the Start button, and then clicking Control Panel. In the search box, type screen saver, and then click Change screen saver.
- Under Screen saver, click the list, and then click Photos.
- To specify the photos to use for the CRISM Screen Saver, tap or click Browse, choose the CRISM Screen Saver folder that contains the CRISM Screen Saver photos, and then tap or click OK.
For more information on how to change the screen saver using Windows 7, please visit: http://windows.microsoft.com/en-us/windows7/use-pictures-as-a-screen-saver
- Windows Vista:
- Open Screen Saver Settings by clicking the Start button, clicking Control Panel, clicking Appearance and Personalization, clicking Personalization, and then clicking Screen Saver.
- Under Screen saver, in the drop-down list, click Photos.
- Click Settings to choose the CRISM Screen Saver images for your slide show and select other options. After you make your changes, click Save.
- Click OK.
For more information on how to change the screen saver using Windows Vista, please visit: http://windows.microsoft.com/en-us/windows-vista/change-screen-saver
- Windows XP and earlier:
- Right-click the desktop, and then click Properties.
- In the Display Properties dialog box, click the Screen Saver tab. Then, click the Screen saver list. Add the CRISM Screen Saver folder as the photos directory.
- Click OK.
For more information on how to change the screen saver using Windows XP, please visit: http://windows.microsoft.com/en-us/windows-xp/help/setup/create-screen-saver-using-photos